PostgreSQL for Beginners, learn by building your own Mailing List Database!
Table of Contents
- Why PostgreSQL over Google Sheets or Excel?
- Setting up our PostgreSQL database
- Building the subscribers table
- Adding new columns to our Subscribers table
- Registering our first email subscriber in our subscriber table
- Time to have a look at our data in the Subscribers table
- Enabling our first subscriber for email newsletters
- Deleting unwanted rows in our subscribers table
- Bonus TIP: Indexing email column for performance
- Conclusion
In this guide of mine I'll teach you the basics of PostgreSQL (pgsql for short) by showing you how to build and manage your own mailing list database.
Why PostgreSQL over Google Sheets or Excel?
Why would you use a relational database like PostgreSQL, MSSQL or MySql for building your mailing list database over something like an google sheet or excel document?
Well, here are a few reasons why:
- Performance for large mailing lists
- Data integrity (prevent duplicate, missing emails or invalid values etc...)
- Simple to advanced queries for reporting
- Ease of integrations with tools, websites (to capture the emails) or programming languages for automation scripts
- Ease of data management (imagine having to update certain rows or populate new columns based on specific criteria in a spreadsheet with 150k rows, this can easily be done in pgsql within 5-10 minutes)
Setting up our PostgreSQL database
Before we can build our mailing list database, we need a PostgreSQL database to house our data, to quickly setup this database we can make use of Podman to do the heavy lifting for us.
podman run --name my-pgsql -v pg-data:/var/lib/postgresql:z -p 5432:5432 -e POSTGRES_PASSWORD=secret -d postgres:latest
Tip: this command works with docker as well. Simply replace podman with docker.
If you've never worked with podman, here is how you can get started.
After running the above command with Podman or Docker, we can run the following to confirm if PostgreSQL has started successfully and is running:
podman ps
You should see the PostgreSQL instance we created named my-pgsql and it's status should be running.
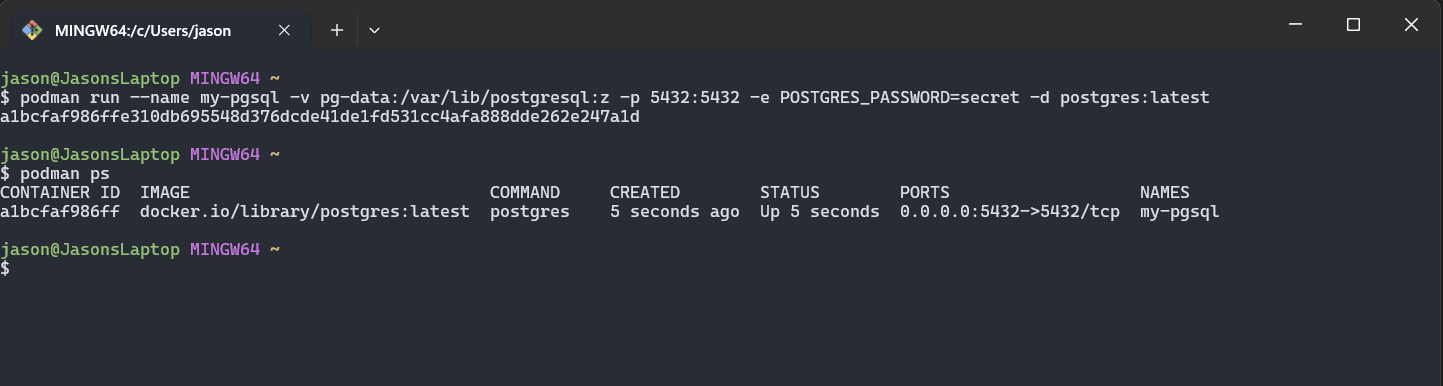
Lets breakdown the output:
- our postgres container is named
my-pgsql - the status is
running- this is good 0.0.0.0:5432->5432/tcpthis means that all traffic on port 5432 on our computer is being forwarded to the container on port 5432 for the protocolTCP
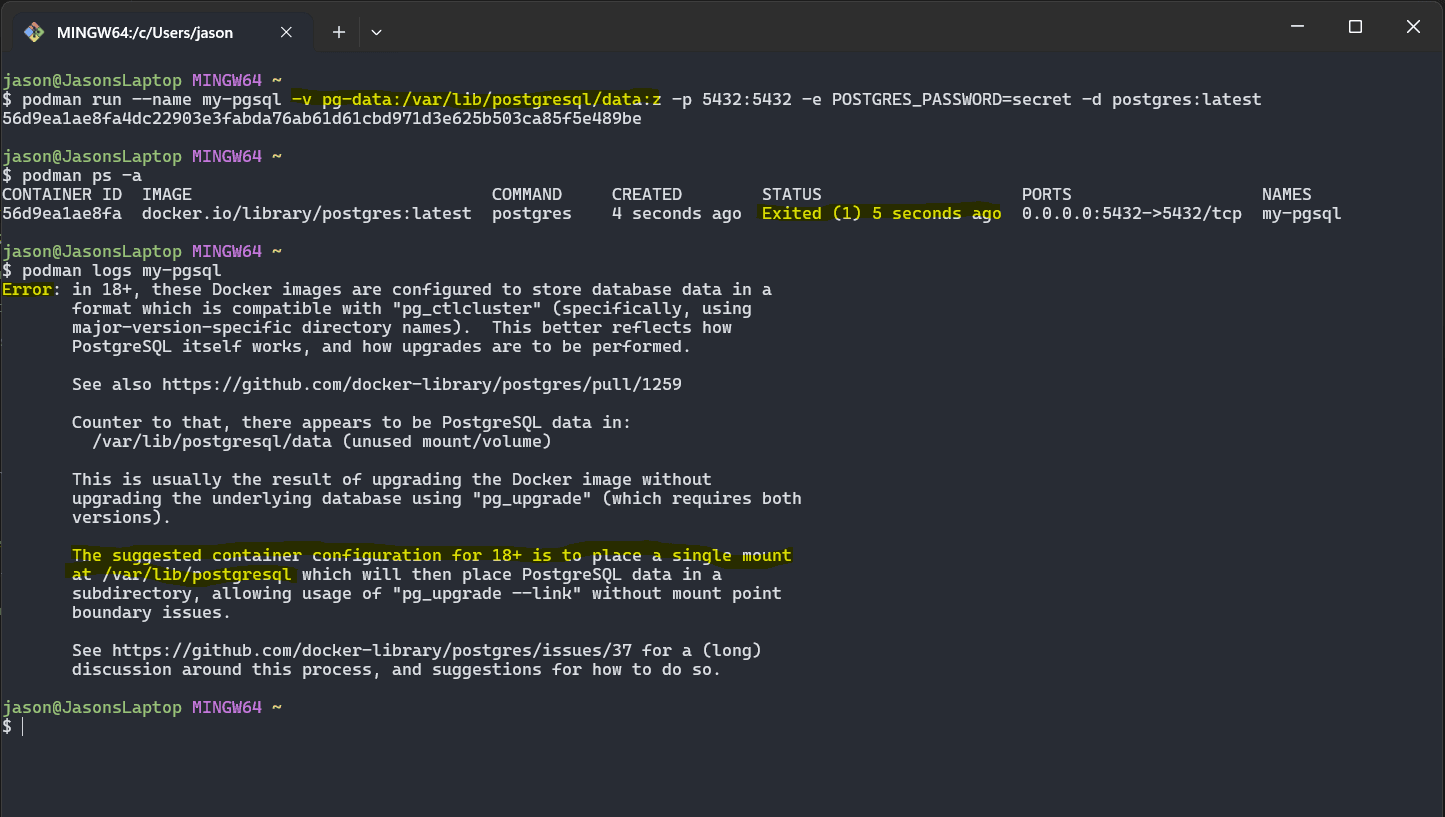
Troubleshooting Our Container Instance of PostgreSQL
if you didn't see the container listed using the podman ps command, this means its not running and something went wrong.
To troubleshoot:
- First confirm that the container was created successfully using
podman ps -a, if you see it but with the statusExited; this means an error occurred. - Use the
podman logs my-pgsqlcommand to inspect the logs from the database to see what went wrong in order to fix it.
In this snippet, the directory where PostgreSQL container images have changed with version 18+ , this is how I diagnosed and fixed it by updating the volume directory in the podman command I provided above.
Testing our newly setup PostgreSQL database
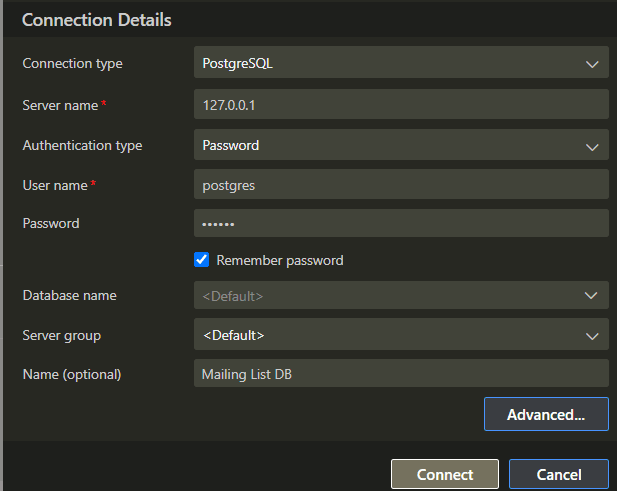
You can use your favorite tools to connect to the newly setup database with the info provided above. My tool of choice is Azure Data Studio with the PostgreSQL plugin.
NOTE: Azure Data Studio EOL is on February 28th 2026, I'm looking at other database tools in the mean time, once I've found one I'll update this guide.
Lets configure our connection to the database. By default a user is created named postgres, this is an admin user and it's not best practice to share the credentials and use this user in production setups, but for our use case in this guide it will work just fine.
To connect to PostgreSQL we need the following information:
- Hostname - where does PostgreSQL live on the network (localhost or 127.0.0.1)
- Port - the specific channel we will use to connect to it (5432 from our podman command)
- Username - the user we will be logging in with (postgres)
- Password - the password for our user (secret - this is from our podman command above, if you've used another password in the command, then use that one)
With your database tool of choice, you can configure your connection details and click connect:
Troubleshooting Connection Errors
If you encounter any socket not connected or connection refused style errors, this usually indicates any combination of the following:
- Our postgres database is not running (we confirmed it is with the
podman pscommand above) - Its listening on a different port (we configured the connection details to use the same port as our podman command and confirmed its forwarding traffic to our computer from the container)
- Its not listening on the hostname we provided (localhost vs 127.0.0.1)
Building the subscribers table
In all relational databases, the data is stored in tables (you can think of them like spreadsheets), before we can start saving subscriber emails in our database we need a table to store it, so let's build one:
The syntax for building new tables in pgsql looks like this:
create table [table-name] (
    -- Here we define the columns
    [column-name] (column-type) (constraints),

    -- other columns
);
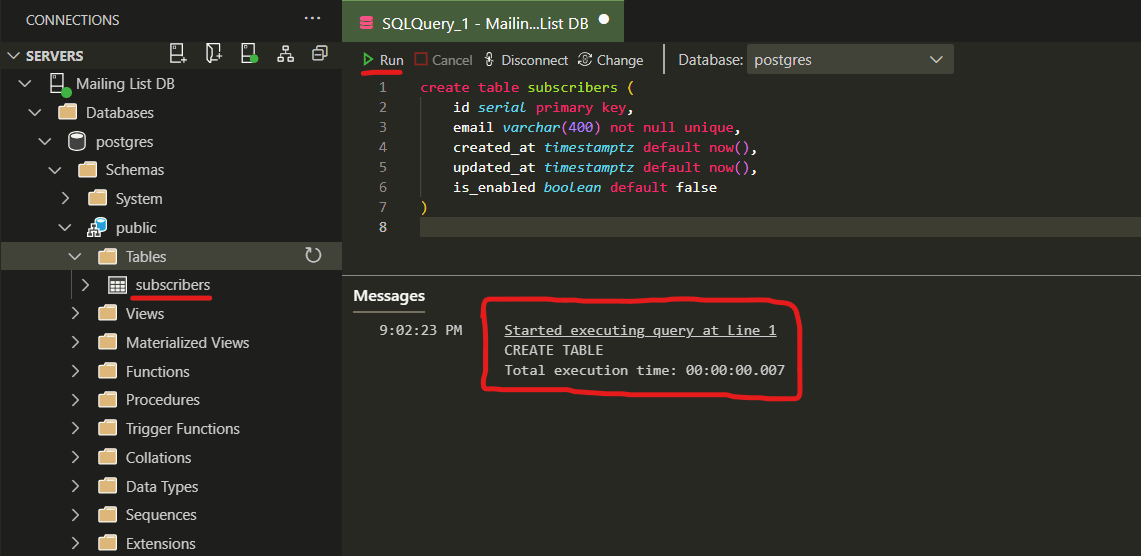
Let's see the create table syntax in action and break it down further:
create table subscribers (
    -- the serial type allows pgsql to auto-increment the id in the column for every newly inserted row (1,2,3...)
    -- primary key tells pgsql that this column is the main way to identify rows and should always be unique
    id serial primary key,

    -- varchar stores text content with a max length of 400 characters
    -- not null means every row in this table must have a value (no rows without an email address)
    -- unique prevents duplicate emails from being captured
    email varchar(400) not null unique,

    -- timestamptz stores date time information with the timezone, simplifying dates if you have subscribers accross multiple time-zones
    -- default now() - tells postgres that if no value is provided default the value to the result of now(), which is the current date and time on the computer where postgres is running
    created_at timestamptz default now(),
    updated_at timestamptz default now(),

    -- boolean allows us to store yes/no information as true/false
    -- default to false as we might want to verify the email address first
    is_enabled boolean default false
);
Running the create table query in my DB editor, the table is created successfully and we can move onto the fun part of capturing subscribers!
Adding new columns to our Subscribers table
We created the subscribers table, but forgot to add the following columns that might be useful for us: first_name, last_name and has_opt_out.
Notice the _ in the names, pgsql converts the names to lowercase unless you specify the name in quotes like this: "lastName" varchar(100), but then when querying that column specifically you must use the quotes.
To update our subscribers table we can make use of the alter table query to add new columns, update constraints etc.. It's very useful and good to know.
alter table [table-name]
    add column [column-name] (type) (constraints),

    -- optional
    add column [column-name] (type) (constraints);
Let's see the alter table query in action by adding the new columns to our subscribers table:
alter table subscribers
    add column first_name varchar(50),
    add column last_name varchar(100),
    add column has_opt_out boolean default false;
After running the query, here is the result:

Registering our first email subscriber in our subscriber table
Now that our subscribers table is setup, we can start with adding new subscribers to the table!
To insert new records into the table, we make use of the insert into query, lets have a look at the syntax:
-- the values are index/position based, notice below how I have named the columns and their values to show this.
insert into [table-name] (col1, col2) values (col1-val, col2-val);
It's pretty simple and in general so is SQL once you get the hang of the basics. Now to see the insert query in action:
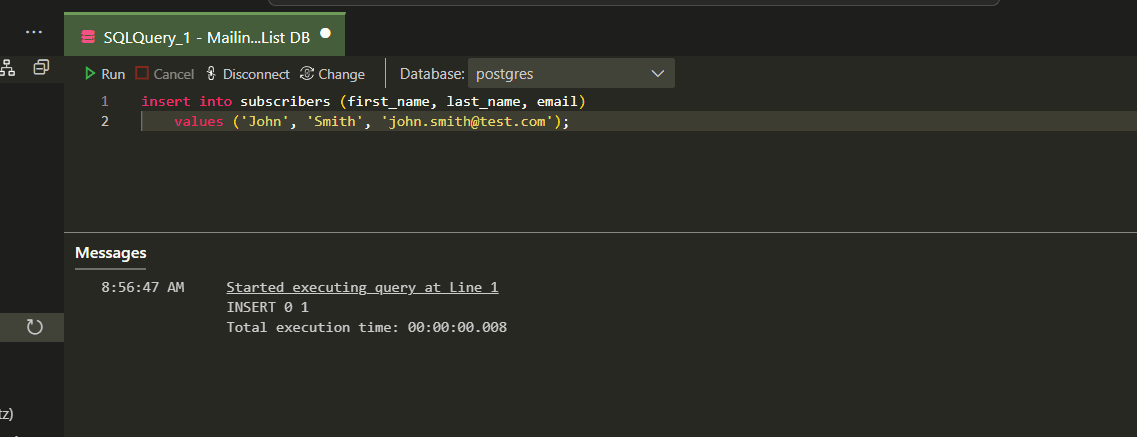
insert into subscribers (first_name, last_name, email)
    values ('John', 'Smith', 'john.smith@test.com');
And here is the result when running it in Azure Data Studio:
Remember our constraints that we set on the subscribers table? Let's test it by trying to re-insert John Smith's email:
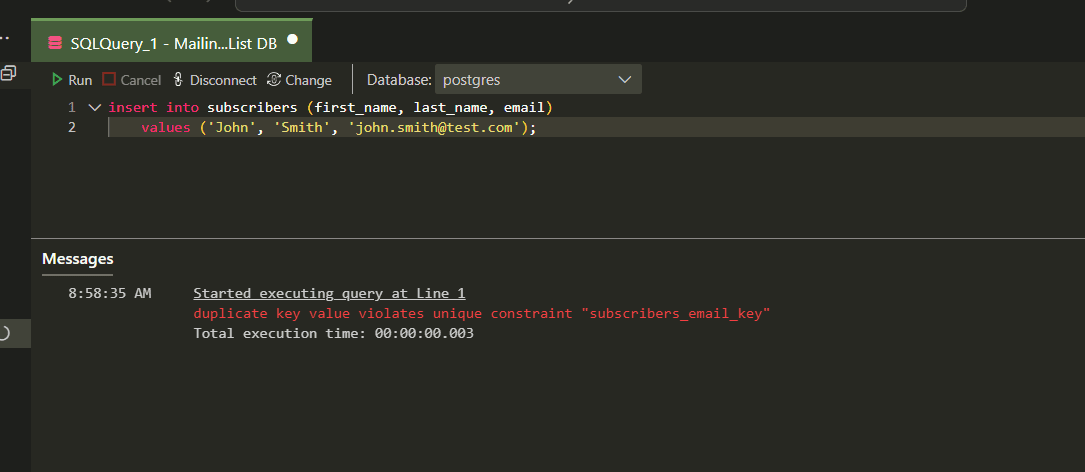
What you'll notice is that PostgreSQL doesn't allow us to insert duplicates, guarding our data with the constraints we set and ensuring it stays clean and we don't have headaches to deal with later.
Time to have a look at our data in the Subscribers table
We've now reached a point where its time to start looking at the data we've captured and we can do this with the select query.
select queries are quite powerful in SQL, they range from simple queries to complex aggregations to build the views needed for analytics, trends and all those good things, but we'll keep it simple.
Here is the syntax for the select query:
-- with the select, we define what columns we would like to see, specific columns or all columns with *.
select col1, col2, *
from [table-name]

-- the where clause is where we define our filters for the rows, we can make use of and/or to combine multiple different conditions.
-- TIP: use parenthesis to be clear on your and/or conditions as AND takes priority over OR.
where
    (col1 = val1 or col1 = val2) and col2 = val3

-- order by clause allows us to sort the rows based on specific columns in ascending or descending order, if not specified it defaults to ascending.
order by col1, col2, col3... [asc|desc]

-- limit allows us to put a limit on how many rows we want returned from the query, useful for massive tables to not return all rows.
limit 10;
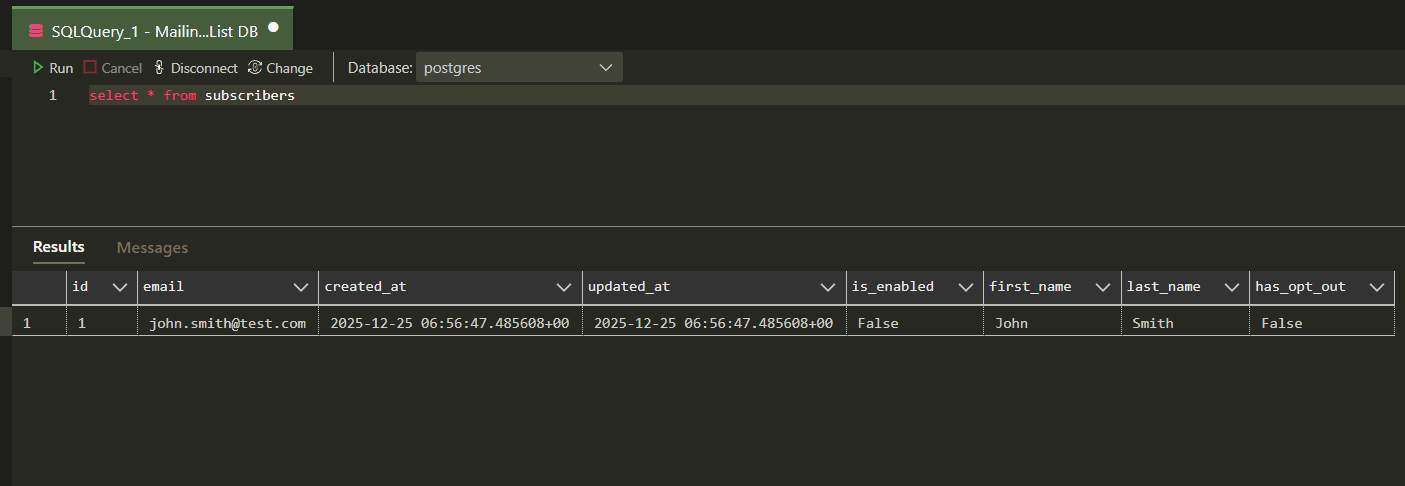
Let's see the select query in action with our mailing list database:
-- give me all the data from the table
select * from subscribers;

-- other query examples:
-- select first name, last name and email where the subscribers are enabled.
select first_name, last_name, email from subscribers where is_enabled = true;

-- select all data where the row id is 1.
select * from subscribers where id = 1;

-- select all data where the rows are enabled and haven't opt'd out.
select * from subscribers where is_enabled = true and has_opt_out = false;

-- select all data where the email is john.smith@test.com, '' are used for text values.
select * from subscribers where email = 'john.smith@test.com';
There is another operator that is very useful in SQL, the like operator. It allows us to do some fuzzy pattern matching using % to say anything before or after.
There can be some performance hits when using like on very large tables.
-- give me all subscribers that have a gmail email address:
-- here the where clause uses lilke on the email column to filter records that have anything before the '@gmail.com' part, to visualize.
-- to visualize the pattern matching -> '****@gmail.com', where the *** is literally anything.
select * from subscribers where email like '%@gmail.com';
Feel free to add a few more subscribers and use the like operator or other conditions to build some queries!
Enabling our first subscriber for email newsletters
If you remember, we had set the is_enabled column to false by default, we did this incase we might want to verify the email first. However we can update rows using the update query.
update [table-name]
    -- set the different column values to their new value.
    set col1 = val1, col2 = val2

-- filter which records to apply this update to, if there is no
-- where clause in this query it updates the whole table.
where col3 = val3
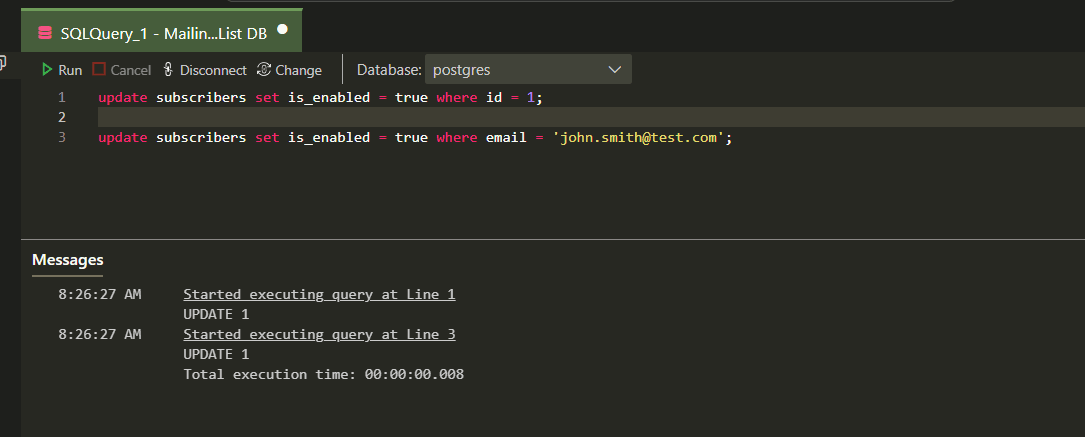
Time to enable our subscriber john.smith@test.com :
-- john smith was our first record, so his id is 1, you can use a select query to confirm or his email in the where clause for the update.
update subscribers set is_enabled = true where id = 1;

-- OR

update subscribers set is_enabled = true where email = 'john.smith@test.com'
Here is the result of both update queries:
Deleting unwanted rows in our subscribers table
In the event when we want to remove some rows from our subscriber table, maybe we received some fake emails that we are no longer interested in; we can use the delete query to remove them from the table.
This is what the syntax looks like:
-- if you don't specify the where clause, it deletes everything from the table.
delete from [table-name] where col1 = val1
Let's add another subscriber that has a fake email that we can remove:
-- add our fake subscriber
insert into subscribers (first_name, last_name, email)
    values ('fake', 'user', 'fake.user@invalid.com');

-- remove that user from our table.
delete from subscribers where email = 'fake.user@invalid.com';
This is what it looks like when we run those above queries, the invalid user is inserted then deleted:

Bonus TIP: Indexing email column for performance
Indexing, a super cool feature of most databases that increases query performance quite a bit depending on the size of the tables.
What is an index? Well, every time you run a query that doesn't use an indexed column, postgres needs to scan the whole table looking for those rows that match the condition in your where clause, like this query for example:
select * from subscribers where email = 'xxx.@xx.com'
If we add an index to the email column, postgres creates something like a lookup shortcut table, now it doesn't need to scan the whole table; it just looks at the index and knows where the record is.
For our subscribers table, its going to be quite valuable to have an index on the email column for fast and efficient queries when we use the email column in the where clause.
Here is how you add an index:
-- NOTE: index names need to be unique across the database, you can't have 2 indexes with the same name on different tables.
create index [index-name] on table-name(column-name)
Time to see it in action:
-- The usual naming format for indexes is: idx_[table]_[col], pretty unique and clear on what table and column the index is for.
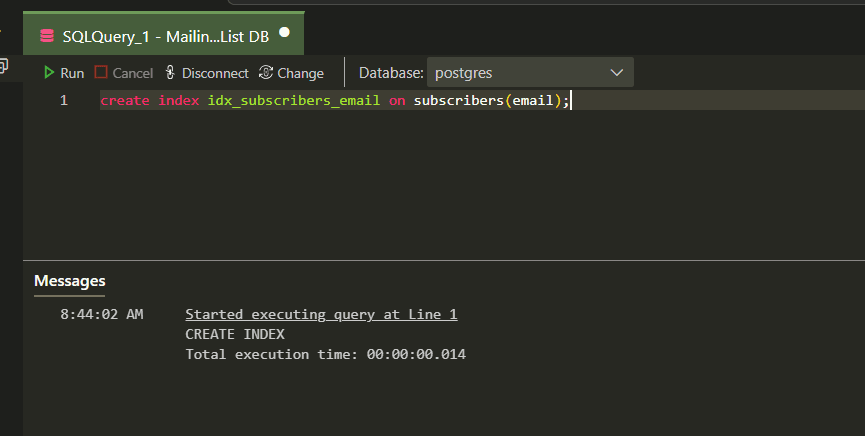
create index idx_subscribers_email on subscribers(email);
This is what it looks like when we run the create index query:
Conclusion
In this guide I've shown you how to setup a quick PostgreSQL database using Podman, we've covered the basics of creating a table, altering it and CRUD operations along with a bonus indexing tip.
Stay tuned for part 2 where we will be creating more tables to use for our subscribers table, covering the following topics:
- Using joins in queries (multiple tables in one query)
- Foreign keys
- Cascading events on tables
- Common Table Expressions (CTE's)
- Group by queries (aggregates) for analytics
As always, thanks for reading and I hope this guide helped you!!