Fixing Permission Denied Errors with Podman Volumes
Table of Contents
Rootless Podman, we love it and sometimes we hate it, luckily any hacker trying to break out of our containers hates it even more!
permission denied is one of those painful errors we all face when we start learning Podman and what makes it tricky is that it's not really Podman that causes it but actually what's going on under the hood.
However I'm going to walk you through my understanding of why these errors occur and a couple scenarios at the end of the guide on how to finally fix them!
Permission Denied with Host Mounted Volumes - Why It Happens
There are two key features of the Linux Kernel that we need to have a basic understanding of, if we want to successfully solve these permission denied errors:
- Linux User Namespaces - feature of the Linux Kernel that creates isolation for containers.
- Linux Filesystem Permissions - controls the ownership, access and operations allowed on files or folders.
Those two points are critical to understand if you want to fix any permission errors that you encounter when using Rootless Podman.
Why only Rootless Podman? - When we run a rootless container, the root user within the container is our user with minimal permissions; however in a rootful container the root user is the real root user outside the container. It has all the permissions and can do whatever it needs to, but not the other users within the rootful container.
When I say users, I mean user owned processes (programs running under the user) so:
- a root owned process (running program) -> has the same permissions as the user root
- an nginx owned process (running program) -> has the same permissions as the user nginx
Linux User Namespaces with Rootless Podman Containers
Containers aren't true VM's in the conventional sense, they use the host Linux Kernel and a few features of the Kernel to create a lightweight, isolated, fake environment that the programs within the container don't know about.
One of the ways this is achieved is with User Namespaces, but what does it do?
- Allows ghost users to exist - container users aren't created on the host system like a normal user (In /etc/passwd)
- Creates a range of User IDs (UIDs) where the root user (UID 0) is mapped back to your user (can be found in these files
/etc/subgidand/etc/subuid) - Every container process has the namespace stored with it, and when it needs to access a file, the kernel translates the process owner UID and then does the necessary permission checks.
But why does it exist?
- Isolation - The programs within the container don't know they are in a user namespace, to them it looks like the host system.
- Security - When a container process wants to access a file or something else, the process UID gets translated to the UID on the host system and its often a user with literally zero permissions; so the kernel won't allow it to do anything outside of the container.
This is a major part of the reason why you get those pesky permission denied errors, its the security features at work, and the more frustrating they are; the better it is - imagine how the hacker is going to feel once they have broken into your container but can't get out!
Linux File Permissions with Rootless Podman Containers
This is the second part to the reason we experience the permission denied errors when using volumes with Rootless Podman.
There are two parts to Linux Filesystem permissions
- Ownership - each file or folder has an owner, user group and others (global access) ownership
- Permissions - each of the previous owners types have read (r), write (w) and execute (x) permissions, if it is a folder you need execute to access the folder.
We can use the ls -l command on linux to view the permissions and owners of files and folders within the current directory, you can also supply a path to the command.
Here is what it looks like in practice:
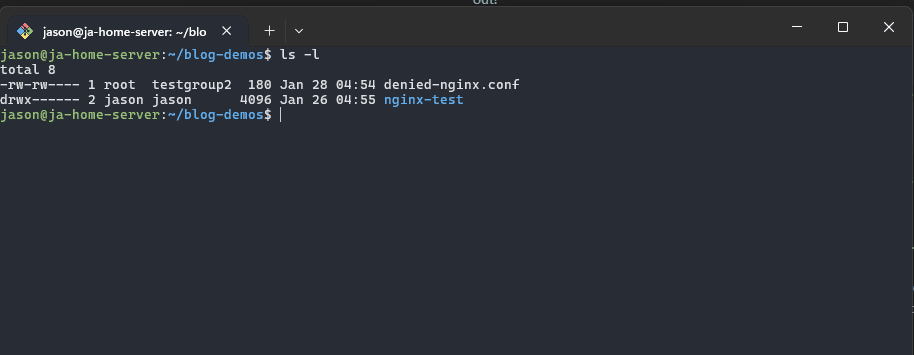
Lets breakdown the output.
The permissions for the first item which is a test file I created called denied-nginx.conf it was the following permissions -rw-rw---- and is owned by root along with the testgroup2 group assigned to it.
As for the permissions:
- The first character indicates what filesystem item it is:
-for filesdfor directories or folderslfor symlink files
- The next 3 characters indicate the read, write and execute permissions for the owner assigned to the file, in this case root is the owner and has read (r) and write (w) but not execute (x) permissions
- The next 3 characters indicate the same, except for the user group assigned to the file.
- The last 3 characters indicate the others (global) permissions of the file, in this case no permissions are assigned.
What would happen if I try to use the cat command to read the contents of that file?
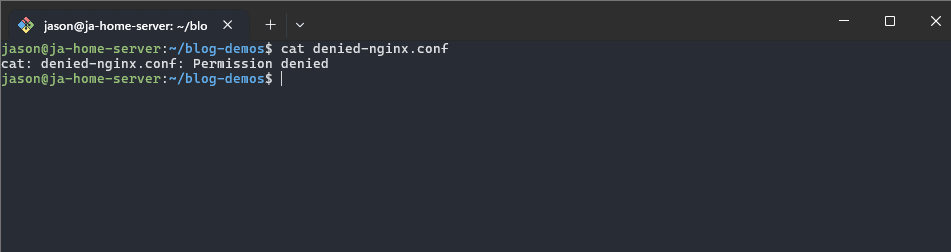
permission denied, but why do I get that error?
- My user (jason) is not the owner of that file, root is the owner.
- My user (jason) is not a part of the testgroup2 user group
- There are no permissions set for others (global)
That's why I get that error and its the same for our containers who try to access volumes without the correct permissions.
At this point, the fix for those pesky permission denied errors with our podman volumes should start to seem obvious, fix the ownership and permissions.
Yep, that is the fix, lets walk through how I debug this error and fix the ownership and permissions.
FUN FACT: The Linux Kernel only checks the UID/GID when it comes to ownership checks, if the process has the same UID/GID as set on the file, they can access it (assuming permissions are correct)
How I Debug Permission Denied Errors With Podman Volumes
Step 1: Permission and Ownership Checks
In this order is the things I check and confirm to fix permission denied errors:
- First confirm the ownership of the file - use
ls -lto see who owns the file and if they have the correct permissions (they should always have read access, but not always write permission) - If the file(s) have correct ownership, I then confirm the parent folders ownership and permissions with the same command - check for the read and execute permissions if execute permission is not granted, the container cannot access the contents in the folder or subfolders.
What you'll notice 9/10 times, is that its the file ownership that's the problem.
Step 2: Finding our Container User to assign to the Volume Files
NOTE: This assumes the fix in the previous step wasn't simply adding write permission to your files but rather an ownership problem that needs fixing.
IF you can run the container without your volume; you can use the awesome podman top command, it allows you to see all the running processes in the container and which user those processing are running under.
I definitely recommend this approach at all times, it's a lot easier than plan B, which is to mount the dead container and cat the passwd file and then play detective to figure which is the correct user. I'm already annoyed with approach as I'm writing this.
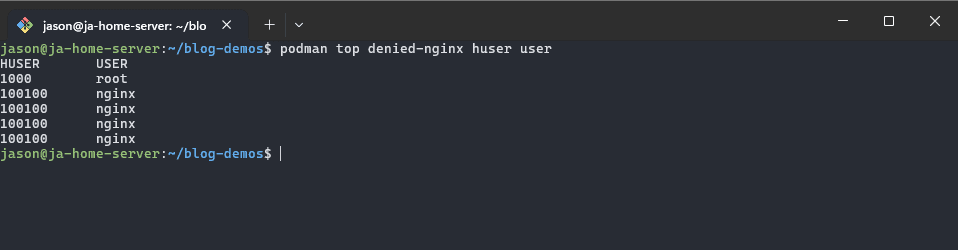
Anywhoo.. Lets see podman top in action:
#huser is host user, user is the user in the container
podman top <container-name> huser user
I've simply created a dummy nginx container which we will use to debug permission issues later on, but here is the command in action:
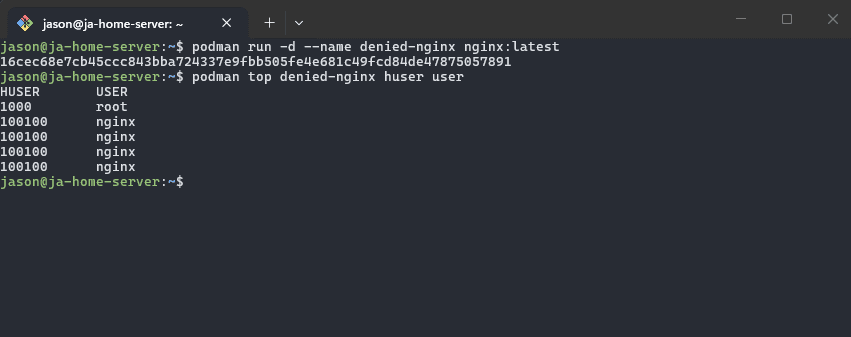
All we really need is the username, but I included the huser column to show you the namespace mapping in action. In this case we can see that nginx is the only running user outside of root (which is my user).
Step 3: Fixing Ownership With Podman Unshare and Chown
podman unshare is a fantastic command and can be really useful at times like these, what it does is put us into the user namespace, so if we know the username of the container user we want to assign to the file, we simply change the owner within the namespace and that's it!
Outside of the namespace the user will be translated to the UID it maps to, but we don't need to worry about that.
# usage
podman unshare chown <username> <file or folder>

# example:
podman unshare chown nginx test.txt
NOTE: chown is a Linux command, it's not something specific to podman, we just use podman unshare to do the user namespace mapping for the user we assign to it.
Example: Fixing Permission Denied with NGINX Public Folder
For this example, I'll create a public folder with limited permissions and use nginx to service the contents. This folder won't have any other (global) permissions. So our container can't simply access it, only our user and user group.
I find it that spending time experimenting, trying different scenarios and trying to answer your own questions with a test or dummy project is a much faster and easier learning experience!
Step 1: Setting up nginx public folder
Let's setup the public folder, you can set it up where ever you'd like.
# Create our public folder
mkdir ~/blog-demos/denied-nginx

# Create our test file to serve
echo "<h1>hello from denied nginx</h1>" > ~/blog-demos/denied-nginx/index.html

# Remove 'other' (global) permissions
chmod o-rwx -R ~/blog-demos/denied-nginx
Step 2: Testing permission denied error for index.html
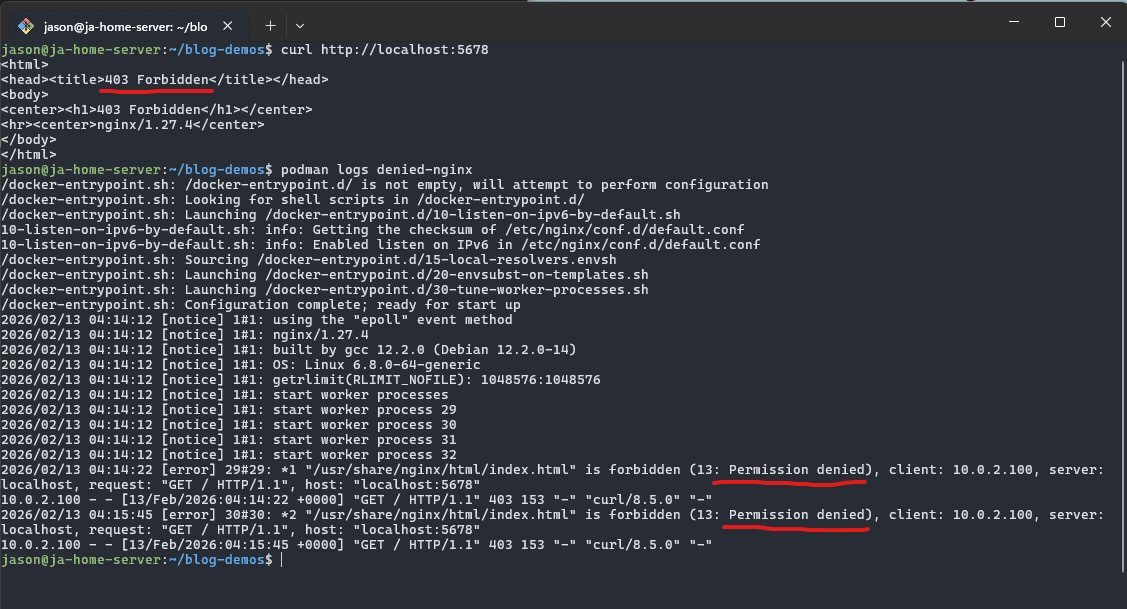
Alright, with our public folder setup and permissions semi locked down; let's test if nginx can access the index.html file we created. But first we need to run nginx and mount the volume.
podman run -v ~/blog-demos/denied-nginx:/usr/share/nginx/html:z -p 5678:80 --name denied-nginx -d nginx:latest
And, boom:
Step 3: Fixing permissions for nginx web folder and files
Using the steps I provided earlier to debug this lets check:
- File / Folder ownership (It's owned by my user and user group with correct permissions)
- What is the container user we need to give access?
Let's find out:
podman top huser user denied-nginx
So we see that the user nginx is pretty common and the user root is my user on the host system, therefor it should be safe to say the nginx user is the one failing to access those files.
NOTE: Don't forget about the host UID (huser) we saw from the result of the podman top command, I have nginx installed as a system service, so when I used podman unshare it didn't use the container nginx user - it used the system nginx user.. if you have nginx installed as a non container, the fix is simply to use the host UID instead of the name ;)
And this actually highlights the point that, everyone's setup is different and sometimes some solutions work for some and not others, what's important is that you have the right tools to investigate and fix the problem for your setup, here it is:
# use podman unshare to handle the user namespace mapping for us.
podman unshare chown -R nginx ~/blog-demos/denied-nginx

# IF: you have nginx installed on your system not in a container,
#simply use the host UID, in that case you don't need unshare as you know the host UID.
sudo chown -R 100100 ~blog-demos/denied-nginx

# view the changes
ls -l ~/blog-demos/denied-nginx
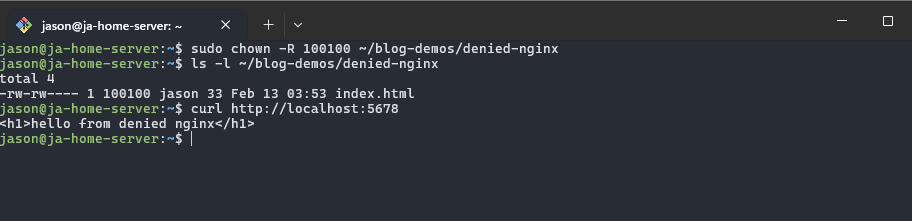
And just like that its fixed, pretty simple in practice but not always very obvious!
Alternative: Podman Named Volumes
If you don't need to use a specific file or folder on the host system, I definitely recommend using a named volume instead. If you don't know what a named volume is: It's a volume that podman creates and configures for us with all the correct permissions.
How do you create a named volume? - Very easily:
# How you create it
podman volume create my-named-volume

# If you didn't create the named volume, podman will create it here for you
podman run -v my-named-volume:/var/postgresql/data .. postgresql:latest
And that's it - done!
Permission Error Free Ending
We covered a lot in this post, and that's because this is one of the areas of Rootless Podman where there are quite a few moving pieces that are all working together to create a secure environment for us to run our containers.
It can be very frustrating for beginners as it was for me. So I wrote this guide covering my knowledge on the topic for the next beginner to have a smoother time learning podman!
Good luck and have fun with your next Podman adventures with fewer permission headaches!
Cheers ;)