Podman Tutorial For Beginners, Learn Podman In 4 Easy Steps
Table of Contents
In this podman tutorial for beginners we'll cover what it is, how to install it and how to use podman to run our containers.
What is Podman?
Podman is a free, open source, daemonless alternative to docker. It brings a few new features to the table like kube and Quadlets while focusing on security by allowing us to run our containers as rootless by default with no extra steps.
Why should you use Podman?
Podman brings the following features to the table that make it worth considering:
- Free and Open Source - Free as in freedom, forever.
- Daemonless design - by default there is no background service in podman, making it light weight.
- Pods - A new way to group and manage your containers easily.
- Kube - Kubernetes style manifest files to quickly spin up your containers or deploy to a kubernetes cluster all from podman.
- Quadlets - Define your containers as systemd service files, automatic startup with all the bells and whistles of a systemd service.
- Podman Desktop - Intuitive, user friendly desktop application that doesn't ask you to sign in.
- Rootless by default - Tighter security by following the rule of least privilege.
- OCI Compliant - Podman is compliant with the Open Container Initiative (OCI), allowing you to build and run images from other OCI compliant platforms like docker with seamless integration.
Step 1: Install Podman
Before we can get into this podman tutorial, you'll first need to install podman.
I recommend you install Podman desktop as it contains both the CLI and the desktop app. It's pretty good.
Step 1.1: Install Podman on Linux
If you only want to install the CLI, on Linux it's as simple as using your favorite package manager such as apt:
sudo apt install podman
Step 1.2 Install Podman on Windows
For a Podman Windows installation I recommend you read my installing podman on windows guide.
Step 2: Hello Podman! Running a simple podman container.
Right, let's get started with this podman tutorial by following a tradition in software development, where everyone's first project was: Hello World!
To run containers we use podman run command:
So open up your terminal / command prompt of choice and run the following command to spin up a hello world container with podman:
podman run hello-world
After running that command you should see something like this:
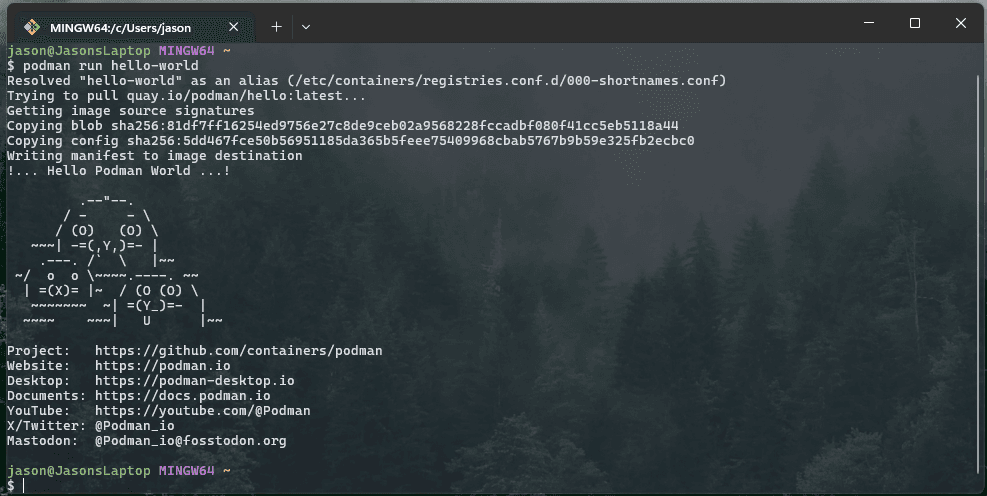
Congrats! You've run your very first podman container, it's that simple!
Step 3: View your containers and how to stop, start and remove them
When working with containers it's important to know what containers you have running, how to stop, start, remove and inspect their details. That's covered here in this podman tutorial:
Here are the commands you'll use to do all of the above:
Step 3.1: View all your containers:
To view all your containers (or only running ones) you run the following commands in your terminal:
podman ps # view running containers
podman ps -a # view all containers
Running the first one, you should see something similiar to this:
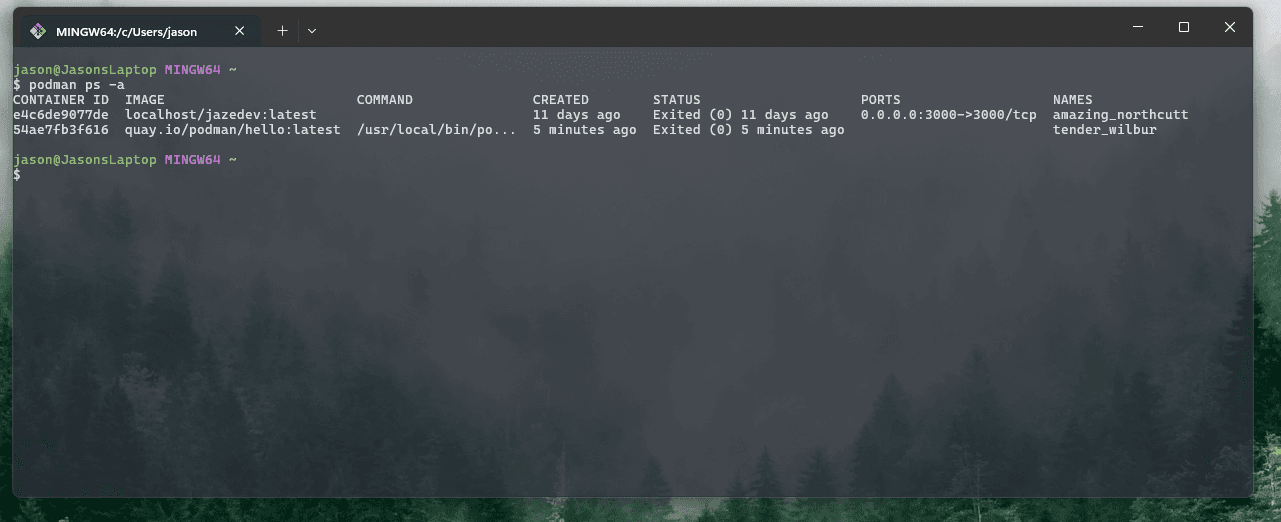
You can see a few cool things from this command, like when you created a container, port mappings, it's name and ID.
I currently don't have any containers running on my machine, but we'll fix that ;)
Step 3.2: Start a container
To start a container, you run:
podman start <container name | id> .. # start a container
podman start container-name-1 container-name-2 ..
Step 3.3: Stopping a running container:
To stop a container, you run this command:
podman stop <container name | id> .. # stop a running container with its name or id
podman stop container-name-1 container-name-2 ..
Step 3.4: Remove a stopped container:
If you no longer want a container and you want to delete it, it first needs to be stopped then you run the following command:
podman rm <container name | id> .. # remove a container with its name or id
podman rm container-name-1 container-name-2 ..
Step 3.5: Bonus, inspect your containers config:
Useful for troubleshooting once you're more familiar with podman and containers, but always good to know, if you run this command you will see all the config for your specific container:
podman inspect <container name | id> # view everything about the container
Step 4: Running containers you'll use everyday like Postgresql DB
Useful flags for the podman run command that we'll need:
These are the most used flags when running containers and they are needed to setup some of the more useful containers, like nginx or postgresql.
--name - gives our container a name that we can use to reference it for other commands
podman run .. --name my-container ..
-v - creates and mounts a named volume in the container for persistent storage, can be specified multiple times, more on working with podman volumes here.
- volume-name - name of the volume to be created or mounted.
- path-in-container - where in the containers file system should this volume be mounted
- SELinux-label - the SELinux label to be used on the volume.
podman run .. -v [volume-name]:[path-in-container]:[SELinux-label] ..
-p - exposes a port on a container and maps it to a host port so we can connect to the apps running in them listening on the exposed port, can be specified multiple times. More on podman networking here.
- host-port - the port on the host machine to map the container port to
- container-port - the port on the container to expose and map to host
podman run .. -p [host-port]:[container-port] ..
-e - sets an environment variable needed for our app in the container, can be specified multiple times.
podman run .. -e [env-var-name]:[env-var-value] ..
-d - runs the container in detached (background) mode.
podman run .. -d ..
How they all fit into the podman run command:
podman run [flags here] image
Running postgresql with podman:
Here is how you run a postgresql db instance with podman:
podman run \
  --name my-pgsql \
  -v pg-data:/var/lib/postgresql:z \
  -p 5432:5432 \
  -e POSTGRES_PASSWORD=secret \
  -d \
  postgres:latest
After running that command you should see your pgsql instance running with the podman ps command like this:
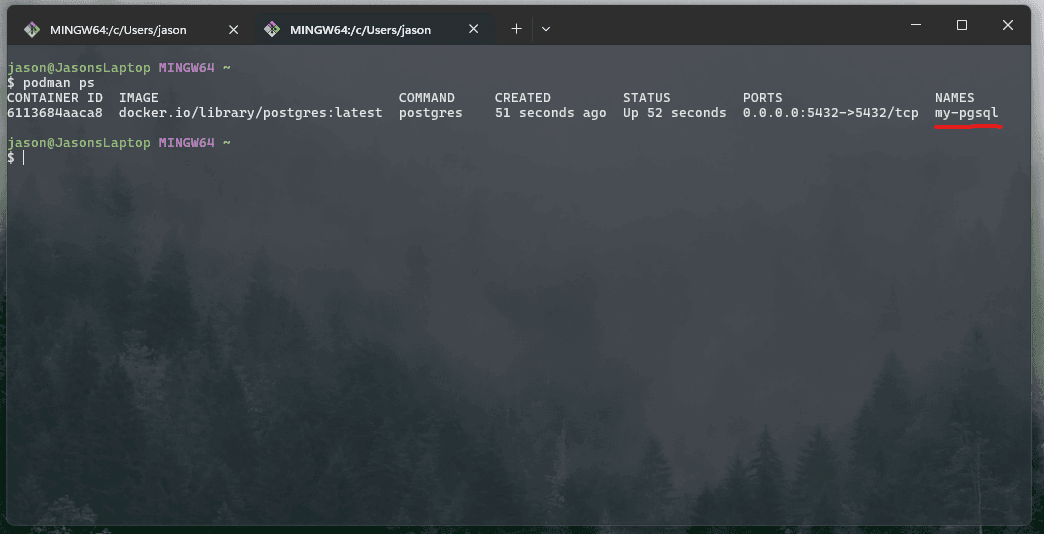
That's it, pretty simple and convenient for spinning up your own database instance for whatever you want to use it for ;)
Wrapping up
In this podman tutorial you've learned the basics of podman and how to use it effectively by spinning up a postgresql db instance, but to leverage the full power of podman there are a few more things to learn.
Here is a simple roadmap to mastering podman with guides along the way:
- Volumes (Guide)
- Networking (Guide)
- Starting containers at startup with systemd (Guide)
- Pods - Guide coming soon!
- Podman kube - Guide coming soon!
- Podman Quadlets - run your containers as services!
It's always helpful to read through the official podman documentation,
Take your time when reading it otherwise you will miss important details - I'm speaking from experience ;)
🔥 Thanks for reading, and I hope this podman tutorial helped you on your containerization journey! 🔥