Table of Contents
Networks in Podman
If you haven't already, check out my Getting started with Podman guide.
Podman networks allow containers to communicate with each other in isolation, without exposing them to the host or to unrelated containers. This increases security by reducing the attack surface of our containers.
Podman Networking: Default vs Custom Networks
When it comes to networking in podman, there are 2 types of networks:
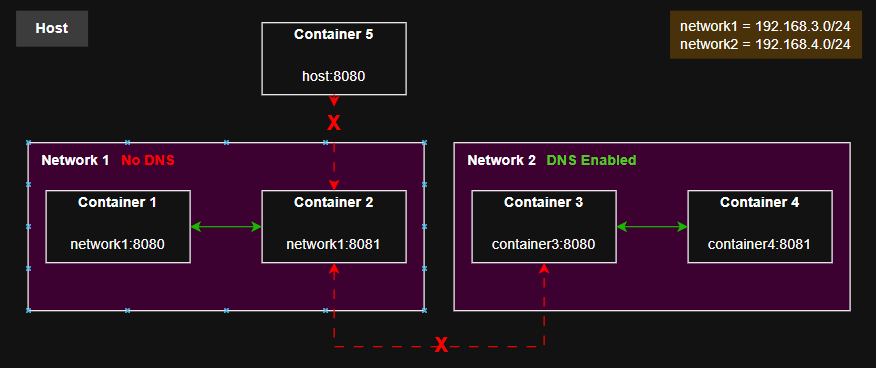
Default podman network - This is the default network, it is the network all containers get added to when you don't specify a specific network when creating it and cannot really be modified. DNS is disabled.
Custom networks - These are roughly the same as the default network, except they have DNS enabled by default and we can finely tune their settings if need be.
Benefits of Custom Podman Networks
Here are a few reasons that make custom networks in podman worth considering:
- DNS Enabled - Easily reference other containers on the network by name instead of IP address.
- Isolation & Security - Only containers you explicitly add are on this network, giving you finer control and improved security.
- Multi-network containers - A single container can easily be added to multiple networks if your needs require it.
To visualize these points better, here is a small diagram:
Managing Networks with Podman
To create and maintain networks, we use the podman network command.
Let's have a look at some basic commands:
podman network ls # list all networks
podman network create <name>
podman network prune # remove any networks not in use
podman network rm <network-name> # remove a network

# connect a container to the network
podman network connect <network-name> <container-name>
# disconnect a container from the network
podman network disconnect <network-name> <container-name>

# this is useful if you reload your firewall which deletes iptable rules
# used by podman for networking.
podman network reload <container-name> # reload network info for container
podman network reload --all # reloads all networks
Why DNS is disabled in Podman's Default Network
According to the podman documentation, DNS is disabled by default for backwards compatibility with docker.
There is a small section from the Github Podman Networking Guide covering how to edit the config file for the default network, I haven't had any luck with this maybe you will?
In the mean time I recommend using a custom network, it's quick and easy.
Demo: Container-to-Container Networking
Here is little demo where we create 2 isolated nginx containers, add them to a custom network and test communication between them.
# create our container network
podman network create test

# no -p flag, containers are not exposed to host (isolated)
podman run --name nginx1 --network test -d nginx:latest
podman run --name nginx2 --network test -d nginx:latest

# IF you didn't specify --network in the run commands:
podman network connect test nginx1
podman network connect test nginx2

# test connectivity and DNS:
podman exec -it nginx1 curl http://nginx2/test
What you'll see is html output of a not found (404) page from nginx. We were able to successfully contact
it but there was no page under /test.
So now the containers can:
- Communicate over the network without being exposed to host.
- Use DNS for communication to easily reference eath other by name instead of IP address as seen in the
curlURL.
Don't forget to cleanup if you decided to run through the example:
podman stop nginx1 nginx2
podman rm nginx1 nginx2

podman network prune
# or
podman network rm test
Bind to port 80 or privileged ports with Podman Containers
To bind to port 80 or privileged ports can be tough, and it's designed to be that way so that unauthorized users and processes can't do it. This is not an issue with podman, but it's a limitation of less privileged services in general.
Normally a service like NGinx or Apache starts with root privileges, binds to ports then drops the privileges. Docker's daemon is rootful by default so it has the privileges to bind to any port.
Here are the options you have to enable binding to privileged ports:
- Running the container as rootful with
sudo podman .... - Using a reverse proxy service like
Nginxto forward traffic to your containers. - Set
net.ipv4.ip_unprivileged_port_startvariable to allow any process to bind to the start port and above. Only set it to the minimum port you need, often 80. - Using
iptablescommand to configure traffic routing from privileged port to your container port.
My recommendations:
- Production Environments - Use a reverse proxy service like NGinx, it's generally best practice as well.
- Development / QA Environments - Mimic production always.
- Home Servers / Dev Machine - Unprivileged port start variable is fine to set.
There are plenty of guides on how to configure these options, please choose the one that best fits your needs and risk appetite.
Summary and what's next
I've touched on a few things about working with networks in podman, let's recap:
- Using the
podman networkcommand to create and manage networks. - DNS disabled for the default network but not newly created networks.
- Your options to get around privileged port binding
- Simple demo to illustrate networking and how to test it.
As always, my guide does not cover everything, I recommend you give the podman network documentation a read as well ;)
Your next step from networks in podman is one of it's key features: pods, which I'm currently writing a guide on.
In the mean time, check out my Getting started with Podman guide. where I give an overview of your learning journey in podman, maybe there is something you missed.
Thanks for reading, I hope this helped you on your podman journey!