Table of Contents
Getting Started with Podman
Podman is a powerful, Docker-compatible container engine that doesn't require a daemon and supports rootless containers out of the box. In this beginner-friendly guide, you'll learn what Podman is, why it matters, how to install it, and how to run your first containers — step by step.
What is Podman?
Podman is an open source, daemonless alternative to docker. It brings a few new features to the table like kube and Quadlets while focusing on security by allowing us to run our containers as rootless by default with no extra steps.
Why use Podman?
Podman brings the following features to the table that make it worth considering:
- Free and Open Source - Free as in freedom, forever.
- Daemonless design - by default there is no background service in podman, making it light weight.
- Pods - A new way to group and manage your containers easily.
- Kube - Kubernetes style manifest files to quickly spin up your containers or deploy to a kubernetes cluster all from podman.
- Quadlets - Define your containers as systemd service files, automatic startup with all the bells and whistles of a systemd service.
- Podman Desktop - Intuitive, user friendly desktop application that does not ask you to sign in every 5 mins.
- Rootless by default - Tighter security by default by following the rule of least privilege.
- OCI Compliant - Podman is compliant with the Open Container Initiative (OCI), allowing you to build and run images from other OCI compliant platforms like docker with seamless integration.
Rootless vs Rootful containers
There are two types of containers we can run with podman: a rootless and rootful container. These indicate the level of
permissions the container is running with.
rootless containers are running without root privileges, making them more secure as they lack the permissions to do most
things on the system.
rootful containers have the same permissions as the root user or admin. Scary, but it's quite difficult for attackers to break
out of containers. Only run containers like this if you absolutely have to.
How to install Podman
We can install either the podman CLI (command line interface) or the desktop appication.
For development environments I recommend installing the desktop application and other environments the CLI. Podman desktop has the CLI included.
For CLI installations:
- On linux you can use your favourite package manager of choice such as apt:
sudo apt install podman. - On windows, there is 1 extra step:
- Setup WSL (Windows Subsystem for Linux)
- Follow this guide from the podman team to ensure its setup correctly: CLI installation guide
If you'd like to install the desktop application you can find it here.
Adding the docker repository
This is optional, by default with podman when specifying image names, if you would like to pull your images from docker you will need to prefix the images with docker.io.
If you would like to setup podman to automatically look for images from the docker repository we can configure it quite simply:
On linux and WSL, you will need to edit your registries.conf file and uncomment / append the following:
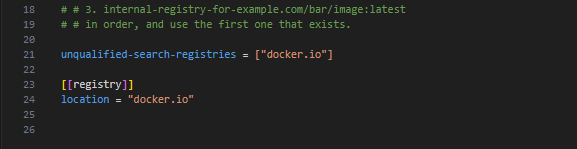
Once this is done, if you have the podman daemon running, restart it for the changes to take effect and then you can simply specify your container images normally like you would with docker. Fantastic!
Basic Podman CLI commands
As mentioned earlier, podman has nearly identical command to Docker. So if you are familiar with docker, you'll feel right at home using Podman.
To run containers we use podman run command:
Let's look at some of the most common command we'll be using with podman:
# basic command synopsis
podman run [options] image

# hello world example
podman run hello-world
podman run --name hello-podman hello-world

podman ps # view running containers
podman ps -a # view all containers

podman start <container name | id> .. # start a stopped container
podman start container1 container2 ..

podman stop <container name | id> .. # stop a running container with its name or id
podman stop container1 container2 ..

podman rm <container name | id> .. # remove a container with its name or id
podman rm container1 container2 ..

podman inspect <container name | id> # view everything about the container
Time for a real world example, by running a postgres db container:
podman run \
  --name my-pgsql \
  -v pg-data:/var/lib/postgresql/data:z \
  -p 5432:5432 \
  -e POSTGRES_PASSWORD=secret \
  -d \
  postgres:latest
Here is a breakdown of what this command does when running our postgres database:
--name- gives your container a name so you can reference it more easily later.-v- mounts a named volumepg-datato/var/lib/postgresql/datainside the container. The:zis for SELinux compatibility.-p- maps container port5432to your host so you can connect to the database from your machine.-e- sets an environment variable, in this case the requiredPOSTGRES_PASSWORD.-d- runs the container in detached (background) mode.
Your Learning Roadmap with Podman
We've touched on a few great commands to get you started with podman, but to leverage the full power of podman these will be your next milestones in your learning journey:
- Volumes (Guide)
- Networking (Guide)
- Starting containers at startup with systemd (Guide)
- Pods - Guide coming soon!
- Podman kube - Guide coming soon!
- Podman Quadlets - Guide coming soon!
In Summary
Podman is a powerful, secure alternative to Docker, that's especially well suited for Linux enjoyers. Whether your just running a few dev containers or looking to integrate with systemd or Kubernetes, Podman has got you covered.
We've learned how to run containers, view our running containers, stop and remove them as well as the next steps to fully learning podman!
My guide doesn't cover everything so I recommened reading through the official podman documentation, take your time when reading it otherwise you will miss important details - I'm speaking from experience ;)
🔥 Thanks for reading, and I hope this helped you on your podman journey! 🔥